Windows 11 enrollment preview built from Windows Insider Programme and unrollment from WIndows 11, Prepare your pc for Windows 11, TPM, RAM bypass reg
 |
| Install Windows 11 |
Microsoft announced Windows 11 on June 24. A trial version of the new Windows (Beta Dev version build 21996.1) was leaked in mid-June. Many people find it and install it on their computer.
Read More: Introducing Windows 11 Hidden Features
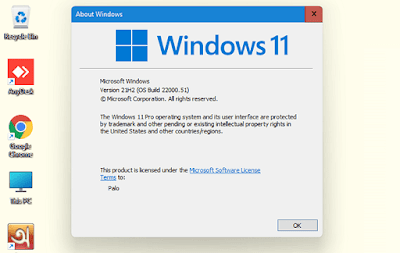
But now no need to download the leaked version. Because, from the settings of Windows, you can easily download and install a trial version of Windows 11 (Beta Dev version build 22001.51). Let's do that today. Learn how to update Windows 8 or 10 to the official beta of Windows 11.
Be sure to back up the necessary data on the computer you want to install.
The minimum requirement to install Windows 11
- 1 GHz or higher 64bit processor
- At least 4 GB of RAM
- 64 GB of empty storage
- The system firmware must be in UEFI mode and Secure boot on also
- Must have TPM 2.0 chip
Prepare Your Device for Windows 11 - Step by Step
In many cases, Windows 11 is not going to be installed on high-configuration computers. Exactly why the problem is, in this article, we will look at the solution and what new benefits have come along.
Most users are facing the first and main problem with TPM 2.0. Press the Win + R button on your current Windows operating system PC to see if you have this TPM chip on your PC.
When the Run interface appears, type ‘tpm.msc’ and press Enter or click the OK button. If you have a TPM chip on your PC, the interface will look like the picture below.
And if there is no TPM chip, then the interface will show.
Even though most of the users have a TPM chip in their PC, it seems that Windows 11 will not run on their PC. In this case, the version of the TPM chip has to be updated.
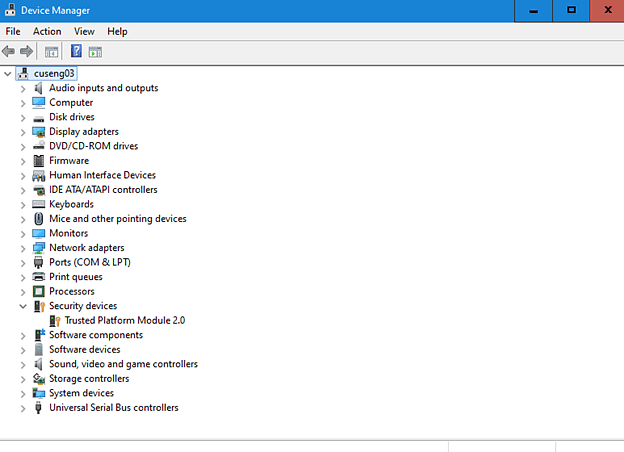
In the beginning, check your PC's Device Manager to make sure you have a TPM chip. To do this, press the Win + R button again. When the run interface appears, type the command 'devmgmt.msc' and press Enter.
You will then see the TPM chip in the Security Devices tab. If the 'tpm.msc' command does not show your TPM chip but shows the TPM chip in Device Manager, then you need to activate the TPM chip from the BIOS.
Restart your PC to activate the TPM chip from the BIOS. And when it is turned off, enter the BIOS by pressing the F2 button (depending on the manufacturer may be F10, F2, F12, F1, or DEL button). Then go to the Security, Advanced, or Settings options, enter the Miscellaneous section, turn on Intel Platform Trust Technology (PTT) and save.
Then go to the boot menu, activate the secure boot option, and restart the PC with 'Save and Exit'.
If it still shows an error message about TPM, then you can download and install the TPM chip driver according to your model from the website of your motherboard brand. (Read Driver Solution Post: Driver Solution You Really Need) If the same model is already installed during installation, go to 'tpm.msc' from the run interface and Clear TPM.
Then your PC will restart and after restarting go to 'tpm.msc' again and click on Prepare the TPM or Setup TPM.
Still don't get TPM chip status, Then read how to proceed then...
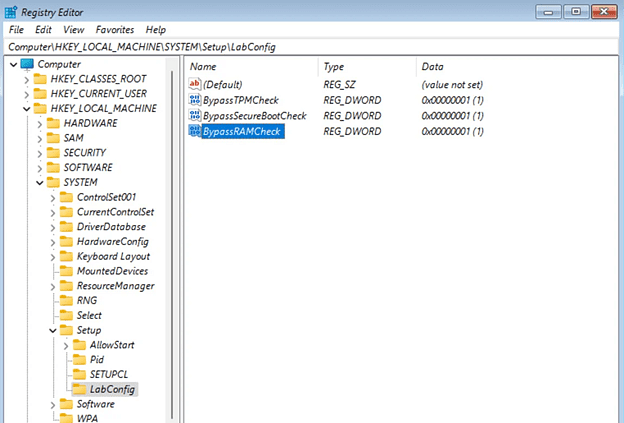
First, start the run by pressing the Win + R button and give the command ‘regedit’ Then go to HKEY_LOCAL_MACHINE\System\Setup and right-click on Setup and select New> Key.
Then press Enter with the file name ‘LabConfig’.
Now right-click the mouse on LabConfig and select New> DWORD (32-bit) value to create another value ‘BypassTPMCheck’, and set its data to ‘1’. Now create the BypassRAMCheck and BypassSecureBootCheck value and set the data to ‘1’, so that it looks like the image below.
Now close the registry editor. Your PC is ready to boot into Windows 11.
For those who have a TPM chip, go to Disk Management. To do this, press the Win + R button as usual and enter the run interface with the command ‘diskmgmt.msc’. Then right-click on your hard disk and go to Properties.
Then go to volumes and see if your partition style is GPT. If MBR, convert the hard drive / SSD to GPT mode. It is better to re-install Windows in GPT mode, as there is a risk of losing data when converting.
Lastly, if your hard drive's boot style is in GPT mode and the TPM chip is enabled, then your PC is supposed to be ready for Windows 11 updates.
The process to download Windows 11 Preview built from Windows Insider Programme - Enrollment
First, go to Windows settings. From there go to Update & Security and click on the Windows Insider program. If you haven't already joined the Insider program, click Get Started.
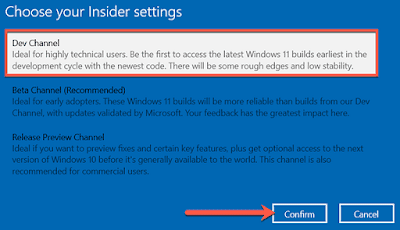
Then click on Link An Account and sign in with your Microsoft account. Once signed in, select Dev Channel in the next window and confirm.
Click Confirm in the next window.
Then restart your PC.
After restarting, go to Settings again, go to Updates and Security and enter Windows Update. Then click on Check for Updates.
After loading for a while, the desired Windows 11 will start downloading.
The process to enrollment from Windows 11
Then if you don't want to get the preview build anymore, go to Settings and select Windows Update from the left side.
Then go to the Insider program and click on 'Stop Getting Preview Builds' and then click 'Unenroll This Device Immediately'.


COMMENTS